Home / Getting started
Getting started
Enable the app
The Webtex app does not require any code that should be inserted manually into your theme. We use the theme’s widgets to make sure the app will work on all 2.0 themes.
To enable the app you should do the following:
- Go to “Online store” in the admin panel of your store;
- Click on “Customize” button near a theme you want to enable the app for;
- Click on “App embeds” icon;
- Enable the toggle for Webtex app.
That’s it. The app is enabled and ready to use 🙂
Add reviews to store front
In order to display the review’s functionality on your store front-end, you should add the review’s widget in your theme:
- go to “Online store” in the admin panel of your store;
- click on “Customize” button near a theme you want to enable the app for;
- switch to the Products in the upper drop-down and choose the necessary template;
- here you need to add the & Product reviews widgets from Webtex in the necessary section into any position you need.
To add a new widget just do the following:
- click on “Add block” in the corresponding section;
- scroll down the pop-up to the Apps section;
- select the Stars or Product reviews widgets from Webtex;
- move them to the right position using the drag-and-drop.
Once you are done, just save the changes and the reviews widgets are added to your store and ready to serve 🙂
Configure widgets
You configure the review’s widget per your needs:
- go to “Online store” in the admin panel of your store;
- click on “Customize” button near a theme you want to enable the app for;
- switch to the Products in the upper drop-down and choose the necessary template;
- click on the Product reviews widget -> the settings of the widget will appear.
Here are the brief explanations of all settings:
- Number of reviews per page - this setting defines the number of reviews shown in the widget per each page.
- Show stars breakdown - this setting displays the breakdown by the rating stars in the summary section on the front-end.
- Show images gallery - this setting displays the gallery with all images uploaded to the reviews.
- Show location - this setting displays the location of the reviews’ authors.
- Available filters - this setting defines the available sorting options of the reviews on the product page.
- Sort by - this setting defines the default sorting order of the reviews on the product page.
- Section padding - these settings define the paddings from the top or bottom of the container, where the widget is added.
Configure app
In order to configure the app go to Apps - Webtex Product reviews app - Settings:
- Display language in the reviews grid - display the language of review in the reviews grid.
- Send review notifications - this setting sends you notifications when a new review is submitted.
- Notification email - you can specify an additional email address to which you want to receive the review notifications. The notifications are also sent to your "Store contact email".
- Hide review title - this setting hides the review’s title field and allows your customers to write the reviews without specifying the review’s subject.
- Allow image uploading - this setting allows your customers to attach images/photos to the reviews. The following file formats are allowed: png, jpg, jpeg
- Enable Pros & Cons - this setting allows your customers to enter pros & cons for their reviews.
- Email address - enter your email address, from which you want to send the emails. Note: you need to validate email in order to enable the emails. If the email address is not validated or empty, [email protected] will be used.
- Multi-language emails - when enabled, your customer will receive a review request email in the language they choose when shopping at your store. For that, you will need to translate this email template to each of your store languages. If no corresponding template is created, the customer will receive an email in the default language.
- Exclude products by type - this setting allows you to disable email requests for orders with products of certain types or to exclude these products from the reviews request emails if there are multiple products in the order.
- Exclude products by tags - this setting allows you to disable email requests for orders with the products with certain tags or to exclude these products from the reviews request emails if there are multiple products in the order.
Translate the app
The Webtex app supports the multi-languages stores. You can rename the texts on the storefront or to translate the app to any language available in your store. In order to do this go to Apps - Webtex Product reviews app - Settings - Translations tab. Choose a language you need to change the translations for and edit the texts.
How to use the app
Moderate reviews
Approval process
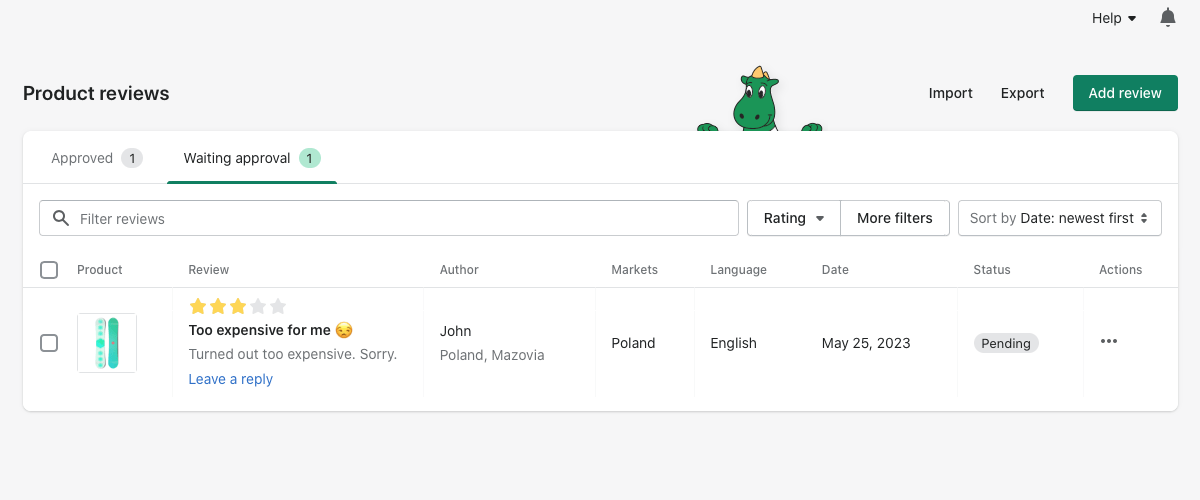
Every review, submitted from the front-end, gets the Pending status and appears in the “Waiting approval” tab. It is done in order to prevent spamming the stores through the reviews.
Once a new review is submitted from the storefront, you receive a notification by email. Then you should view the received review and either approve it or delete it.
Manage reviews
Reviews grid
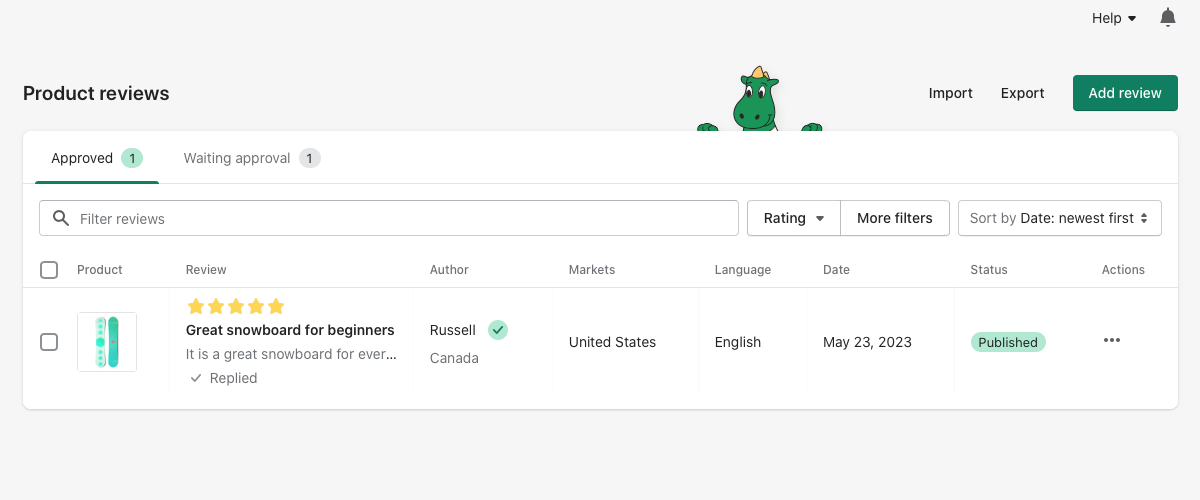
All approved reviews can be found in the “Approved” tab in the reviews grid. The reviews grid allows you to see all necessary details of the review right from the grid. Here you can see:
- reviewed product;
- selected rating;
- review’s title & review text;
- nickname & location of an author;
- verification badge;
- market & language of storefront, from which a review was submitted;
- review’s status.
View review
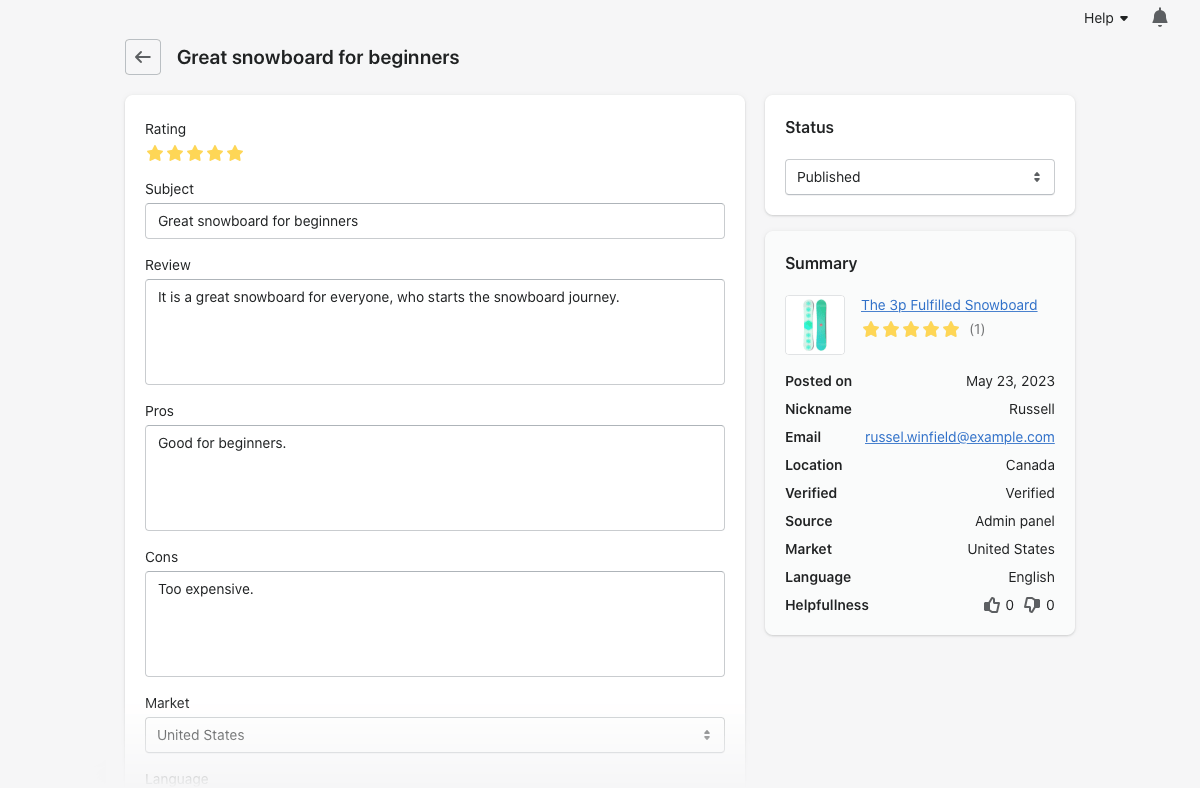
The page with the review’s details shows you the full information about the review:
- Selected rating;
- Review’s title & text;
- Pros & Cons if enabled;
- Verification flag;
- Author’s details;
- Review’s images uploaded by the customers;
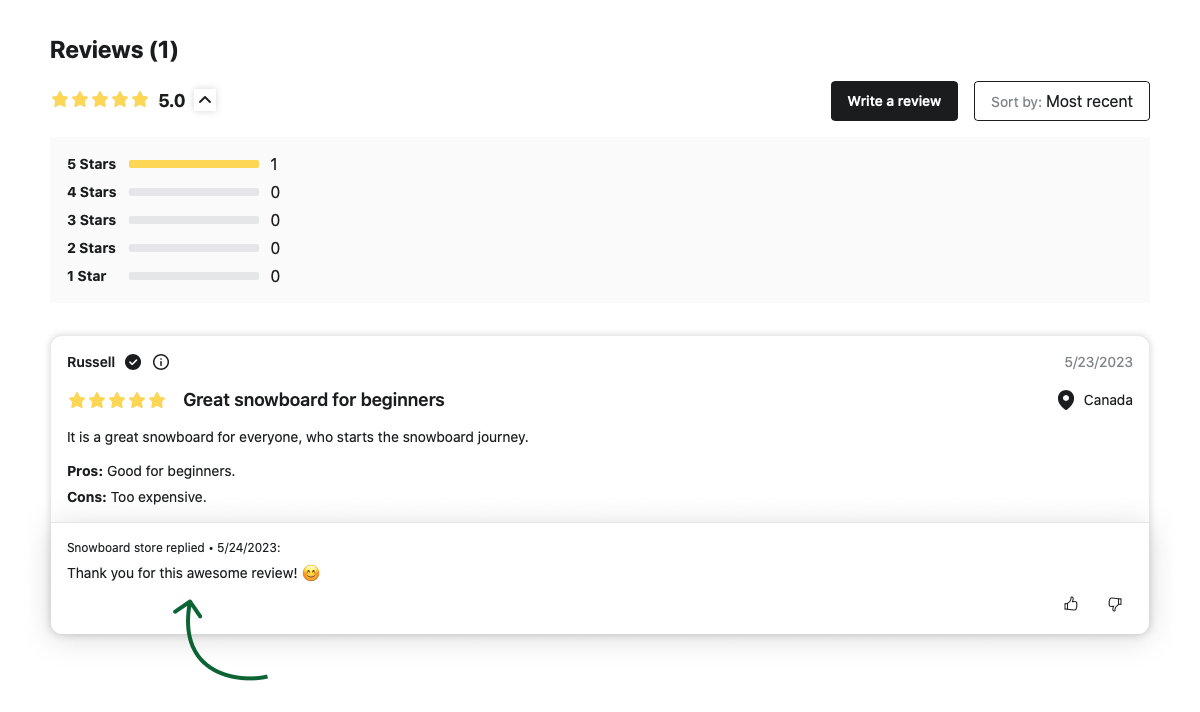
Here you can also reply to a review. Your review will show below the review on the storefront.
There is also the Summary section, which shows you the advanced details about the review:
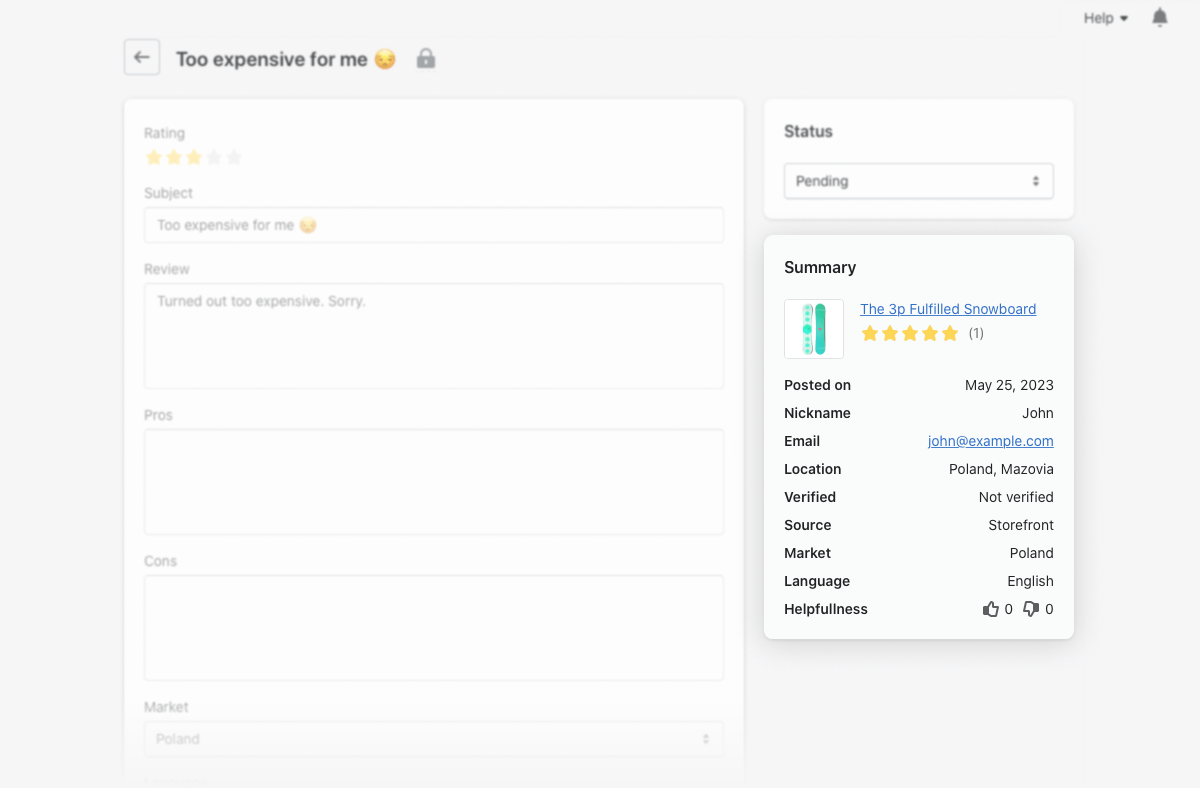
The page with the review’s details shows you the full information about the review:
- Reviewed product;
- Date when the review was posted;
- Nickname & email of an author of the review;
- Location of the author (if a review is submitted from the storefront, the location will be detected automatically);
- Verification status;
- Source (storefront, admin panel or import);
- Market & language of storefront, from which a review was submitted;
- Helpfulness (number of thumb up/down votes for the review).
Reply to review
You can reply to every review. Your reply will be added below to each review on the front-end.
Storefront reviews
All the reviews, submitted from the storefront by your customers, are automatically locked for editing in the admin panel. It is done in order to make sure nothing is changed in the customers’ reviews and to keep the high level of trust to the Verified by app badge.
Import/Export reviews
The app allows you to export your reviews as a CSV file. It might be helpful if you need to copy the reviews between different stores, backup the reviews or import them to 3rd party systems. If you need to import the reviews from other stores, 3rd party systems you can do this using the advanced Import functionality. In order to check the file’s format, you can download a sample file first.
The import process is done in the background and you will receive an email with the import status once it’s done. If there are any errors during the import, the rows with the errors will be skipped in order not to block the entire process. In this case you will receive the errors report to your email to see what errors occurred.
The following columns in the CSV file are required and cannot be removed:
- product_handle;
- status;
- rating;
- author;
- body;
- created_at.
The reviews are assigned to the products using the “product_handle”. In order to find a product handle, follow the steps:
- Go to edit a product in your Shopify admin panel;
- Scroll the page down to the Search Engine optimization section and click Edit;
- A product handle will be visible in the “URL handle” field.
Reviews verification
By the Webtex app: it means that a review was verified automatically by matching the customer’s email in the order and in the review. The appropriate message will be displayed in this review on the storefront: This review is automatically verified matching an order and a review by a customer email.
Products
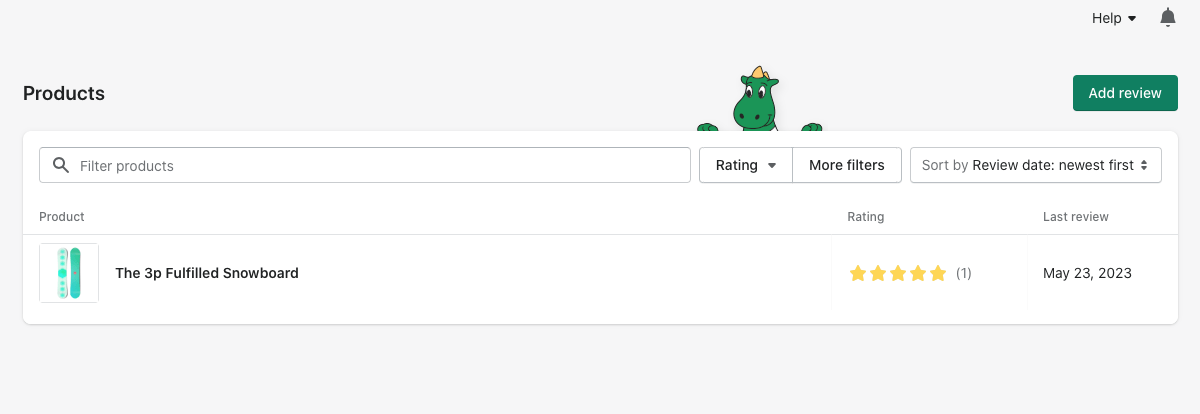
This page displays all products with the reviews. Here you can easily see the number of reviews for every product & a date of last review. You can also filter the products by:
- rating;
- reviews number;
- date of last review.
Widgets
The Widgets page has the list of all available widgets in the app. If you click on the Manage link, you will see a preview of each widget on the storefront.
Integrations

The Integrations page has the list of all available integrations in the app. In order to configure an integration, click on the Configure link.
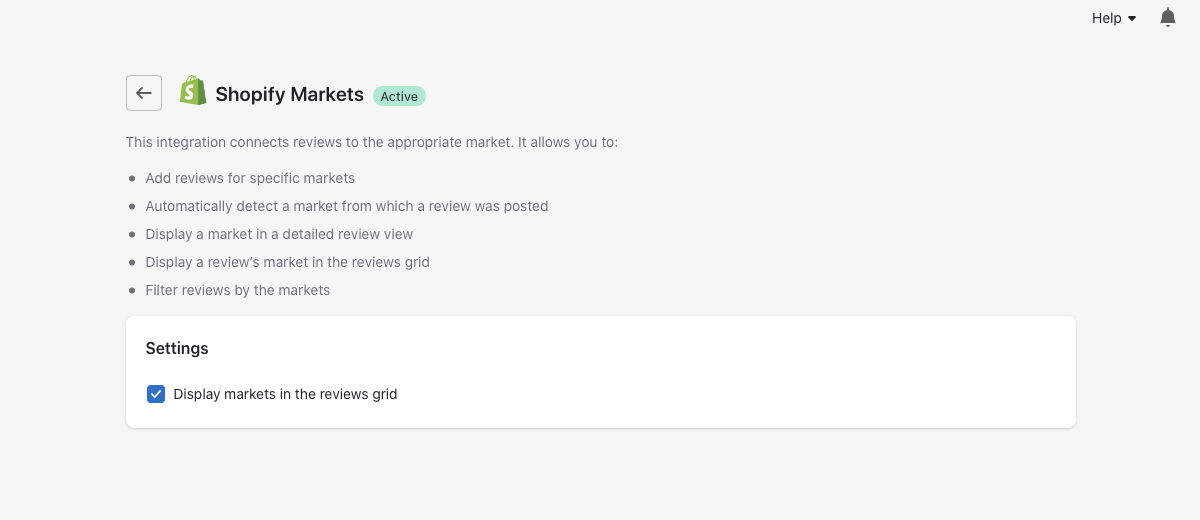
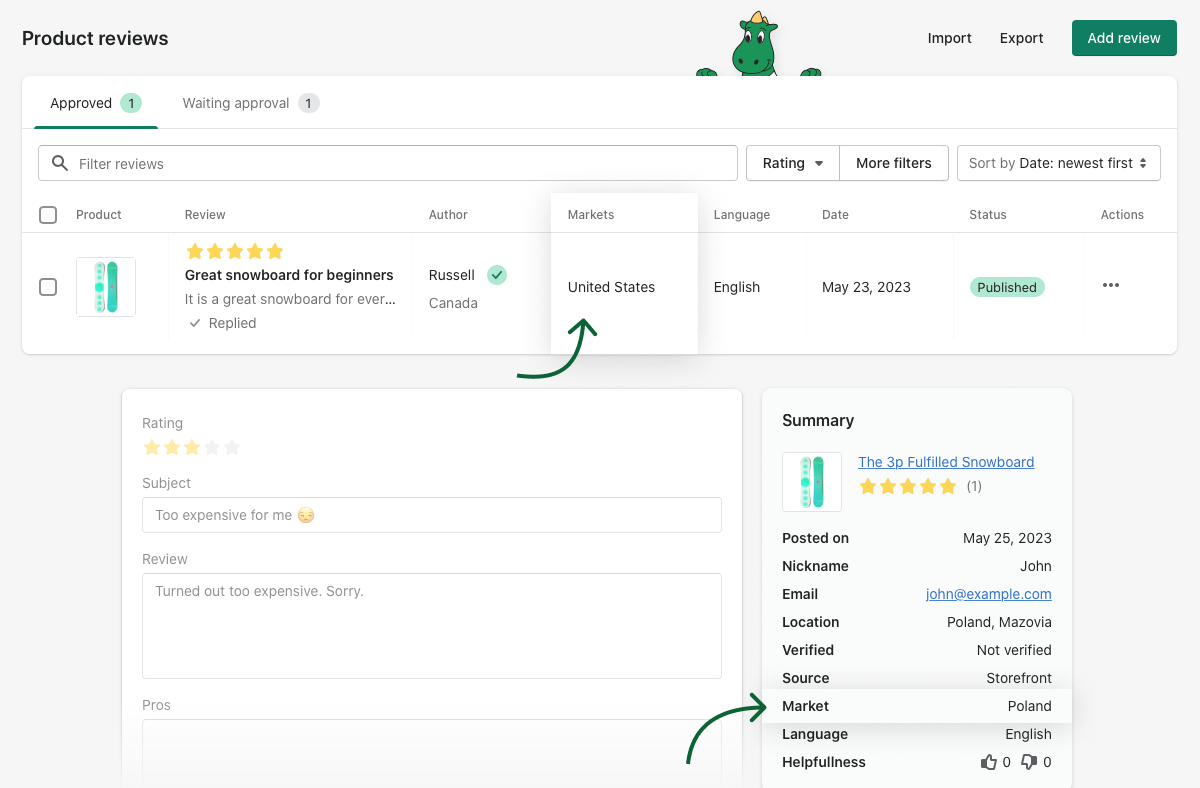
Shopify markets
The Webtex app supports the Shopify Markets by default. This integration enables:
- add reviews for specific markets;
- automatically detect a market from which a review was posted;
- display a market in a detailed review view;
- display a review’s market in the reviews grid;
- filter reviews by the markets.
Email marketing
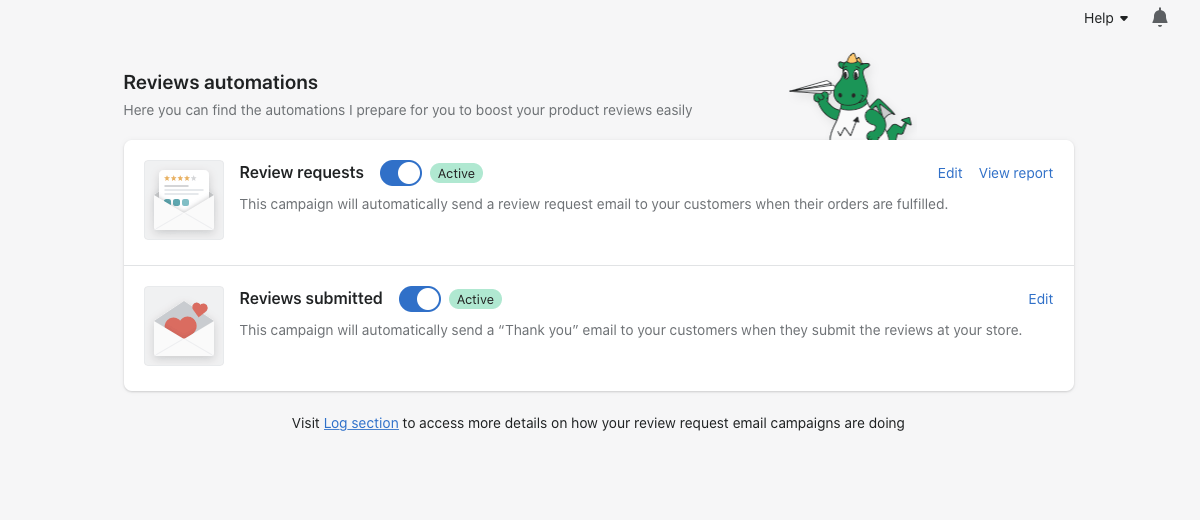
The Webtex app provides you with the ability to launch the automatic email campaigns to collect the reviews by sending the review request emails to your customers in certain periods of time. And to send the thank-you emails automatically right after your customers post the reviews from the storefront.
All campaign's templates are fully customizable per your needs.
You can track the performance of the campaigns via the Logs and the reports (for review request campaigns).
From this page you can also enable or disable the entire campaign.
Review requests
The review request automation sends the review request emails to your customers after certain periods of time after the order was fulfilled. This automation allows you to set up 3 emails with different periods of days after the fulfillment and different email templates if required. The second and third emails will be sent if no reviews are submitted after the first email. These emails can be disabled if you do not want to send them.
Set up campaign
In order to change when the review request emails are sent, click on the “Edit” link for this automation.
Template customization
See more details here.
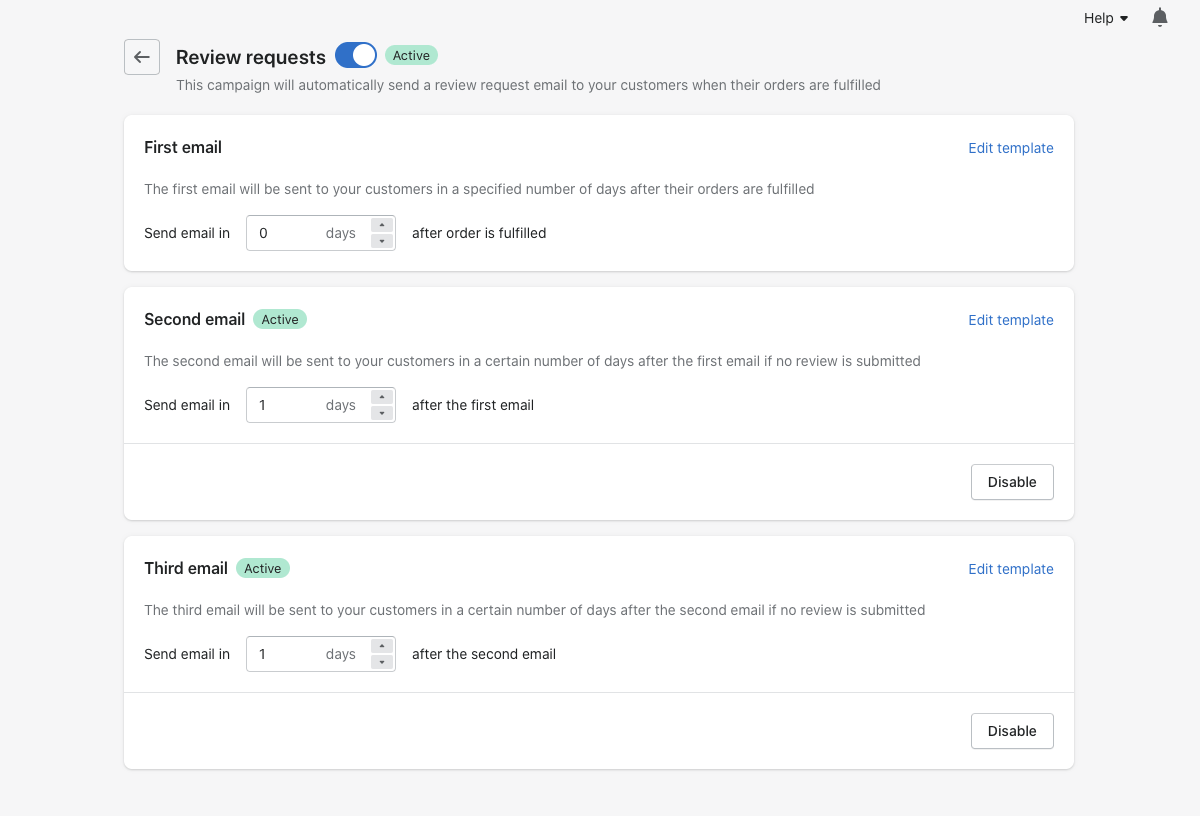
Here you can:
- Enable the entire automation;
- Specify when the emails are sent;
- Disable the second & third emails.
View report
The reports allow you to track the stats of your review request campaigns. You can see the entire chain how the emails perform. You can filter by any periods of time.

‘Thank you’ email
The automation sends the ‘thank you’ email to your customers right after they submit the reviews. No additional configuration is required for this automation.
See more details about how to customize the template here.
Customize template
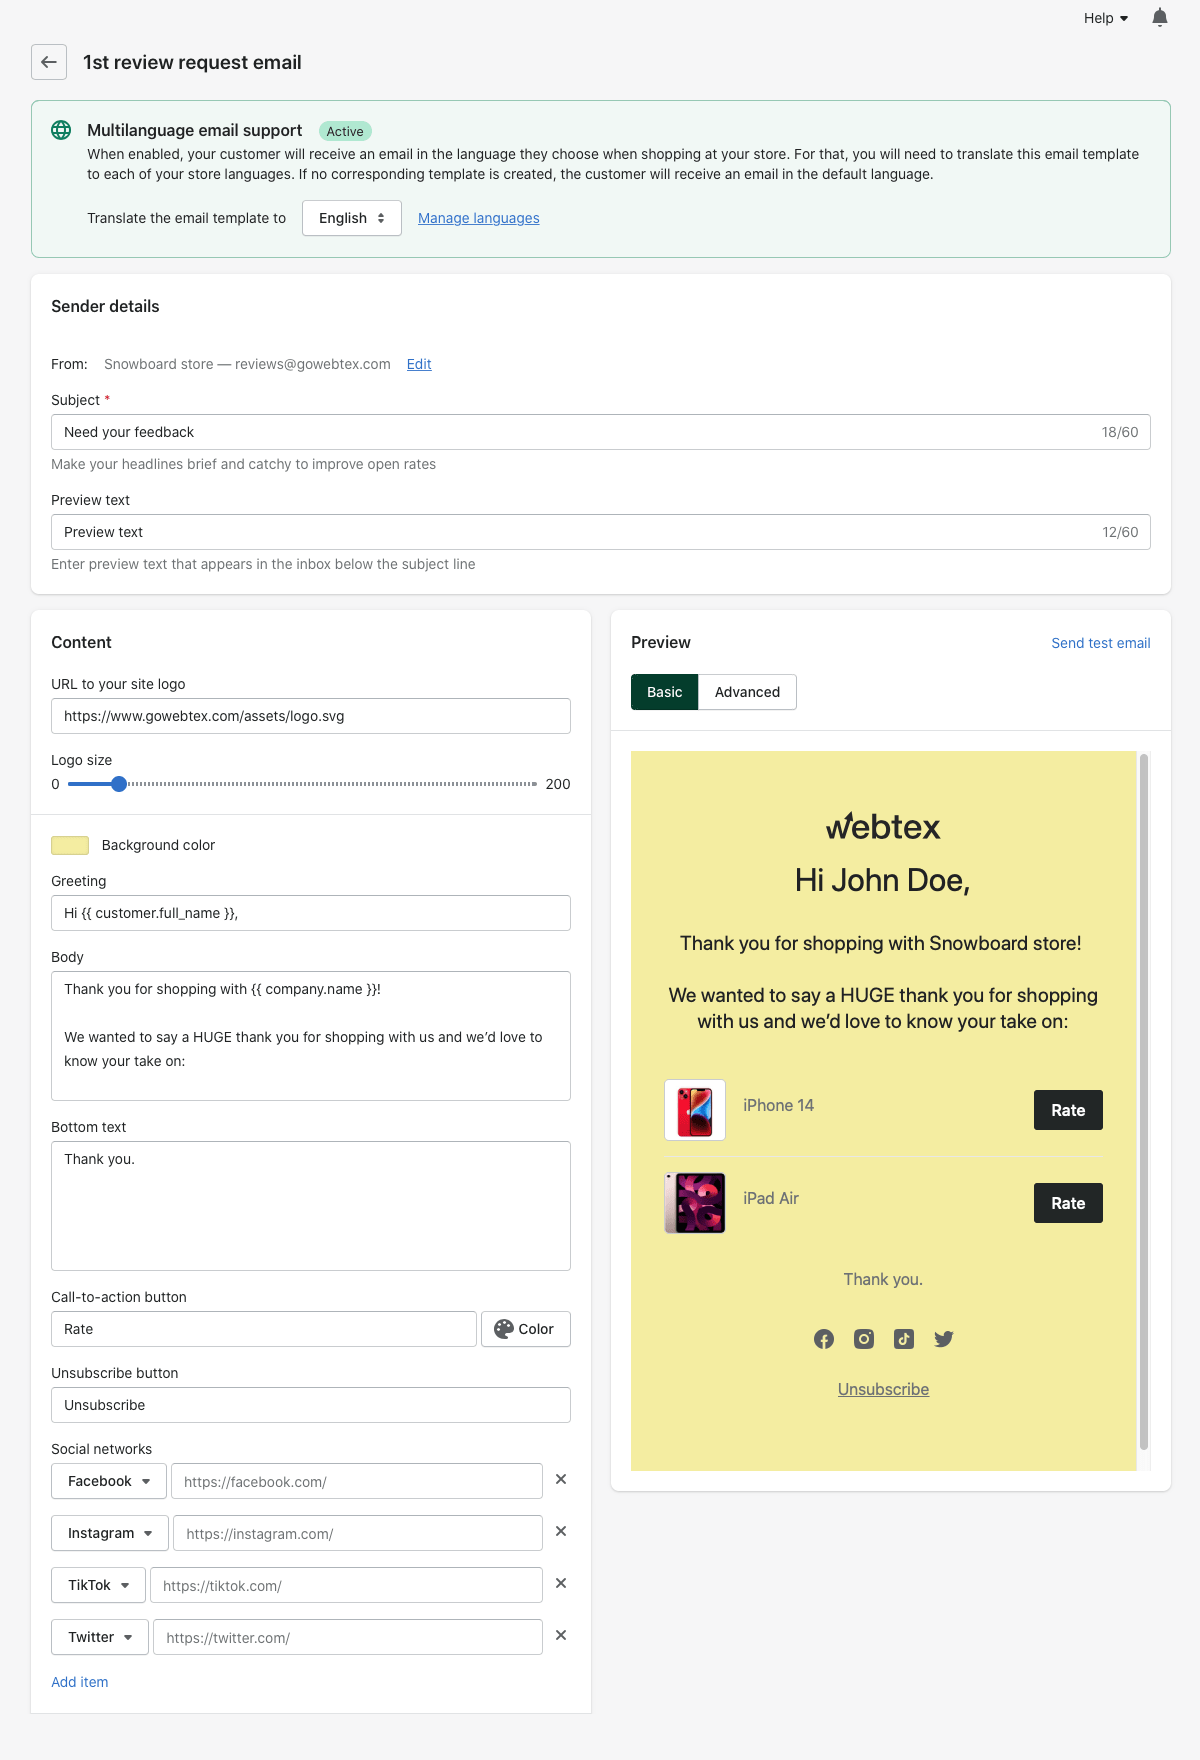
The app has a beautiful email template ready for use out of the box. However, if you need to customize the template you can easily do this in the user-friendly template customizer.
Multilanguage email support
See more details here.
Sender details
This section allows you to change:
-
Sender email - email address, from which you need to send the ‘thank you’ emails. By default the [email protected] email is used. If you want to change it to your email you can do this in the Settings of the app in the “Email address” field.
- Subject - a subject of the email. Emojis are supported.
- Preview - a preview of the email, which appears in the list of emails in your email account. Emojis are supported.
Content
This section allows you to change the main content of the email:
- Logo - here you can add a logo to your email and change its size.
- Background color - here you can change the background color of your email using a color palette.
- Greeting - this text appears in the beginning of the email as the greeting.
- Body - this text is the main content of the email, which appears above the products for review.
- Bottom text - this text is added below the products and it allows you to add any text you want to appear at the end of your email.
- Call-to-action button - here you can change the label of the leave a review button.
- Unsubscribe button - here you can change the label of the unsubscribe button.
- Social networks - here you can add the links to your social profiles.
All changes you make in the Content section are visible in the Preview window on the fly.
Advanced edit mode
The app also gives you the ability to customize the template using the HTML editor. For this just switch to the Advanced mode and you will get the access to change the source code of the email.
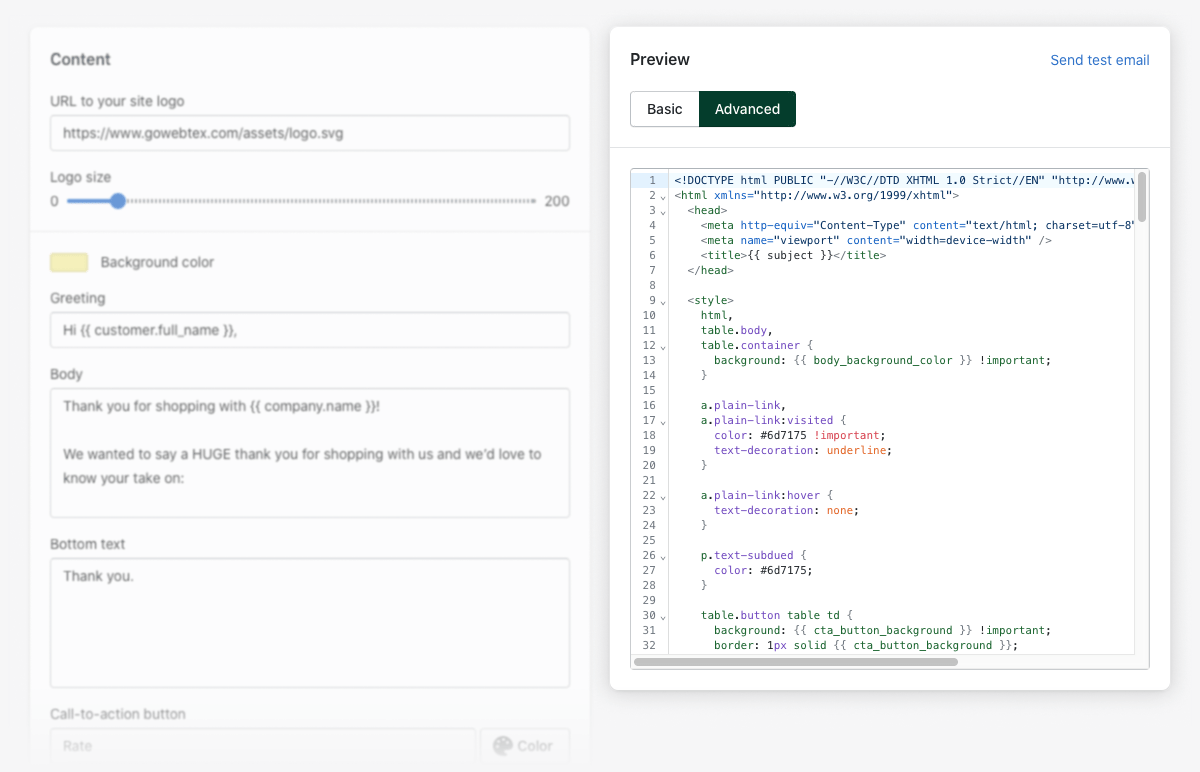
Email variables
You can use the following variables in the emails:
| Variable | Description |
|---|---|
| subject | outputs a subject of the email. |
| preview_text | outputs a preview text of the email. |
| greeting | outputs a greeting of the email. |
| body | outputs a body of the email. |
| body_background_color | outputs a background color of the email. |
| bottom_text | bottom_text |
| cta_button | outputs a title of the call-to-action button. |
| cta_button_background | outputs a color of the call-to-action button. |
| cta_button_color | outputs a text color of the call-to-action button. |
| cta_link | outputs a link of a call-to-action button (for "Review submitted" automation). |
| unsubscribe_button | outputs a title of the unsubscribe button. |
| unsubscribe_link | outputs a link of the unsubscribe button. |
| customer.first_name | outputs a customer's first name. |
| customer.last_name | outputs a customer's last name. |
| customer.full_name | outputs a customer's full name. |
| customer.email | outputs a customer's email. |
| products[index].title | outputs a title of a product with a certain index (product[0] - the first product in the order and etc). |
| products[index].image | outputs the first image of a product with a certain index (product[0] - the first product in the order and etc). |
| products[index].image.url | outputs the URL of the first image of a product with a certain index (product[0] - the first product in the order and etc). |
| products[index].image.alt_text | outputs the first image of a product with a certain index (product[0] - the first product in the order and etc). |
| products[index].url | outputs a link to a product with a certain index (product[0] - the first product in the order and etc). |
| products[index].review_url | outputs a link to a product's review section with a certain index (product[0] - the first product in the order and etc). |
| products[index].tags | outputs tags of a product with a certain index (product[0] - the first product in the order and etc). |
| company.name | outputs a store name. |
| company.email | outputs a store email. |
| socials | list of social networks - выводит список ? |
| socials[index].id | outputs a social network ID (possible ID values: instagram, facebook, youtube, twitter, linkedin, pinterest, tiktok, whatsapp, telegram) |
| socials[index].image_url | outputs a social network's image link |
| socials[index].link | outputs a social network link |
| logo.src | outputs a logo source |
| logo.size | outputs a size of an uploaded image |
Multilanguages email
The app supports the Shopify languages and allows you to translate the emails to the languages added in your store (published & unpublished).
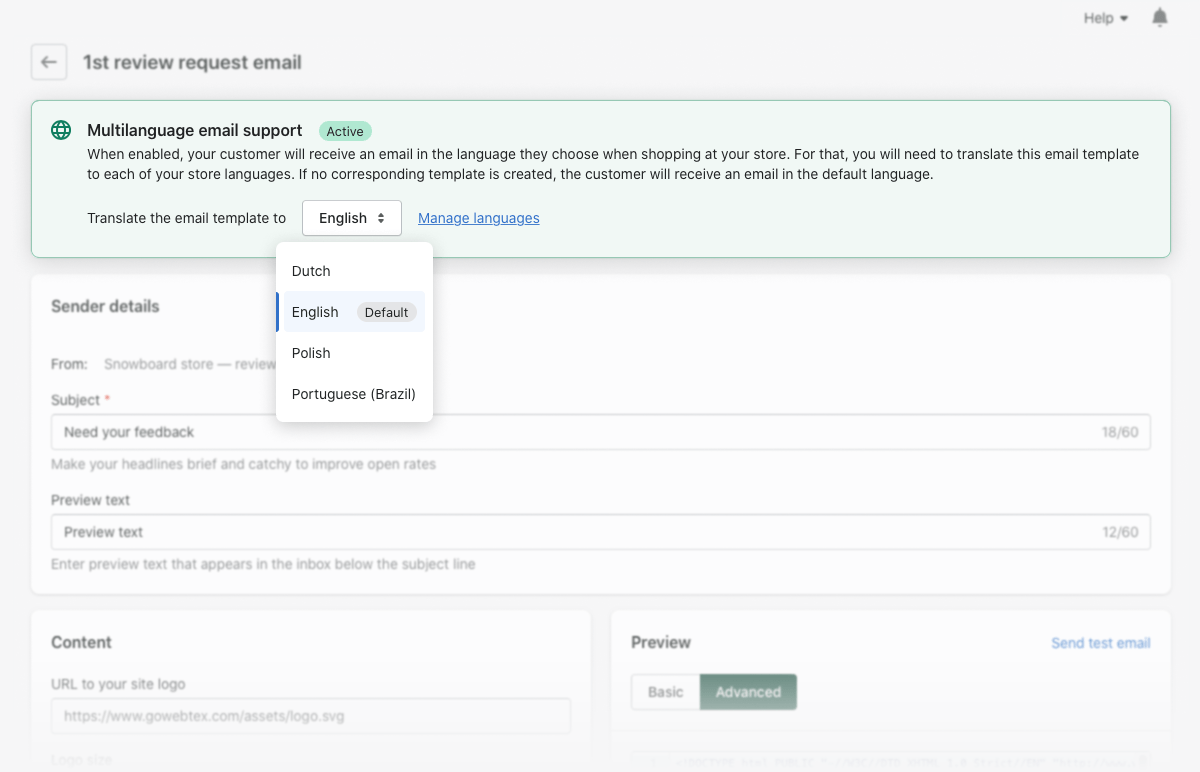
The multi-languages support works the following way:
- For the review request emails the app retrieves a language from an order and sends the emails in this language if there is a translation for it in the app. If a store owner doesn’t translate the emails to this language, the english version of the email is used.
- For ‘thank you’ emails the app retrieves a language from a storefront, from which a review is submitted. The further steps are the same as above.
Logs
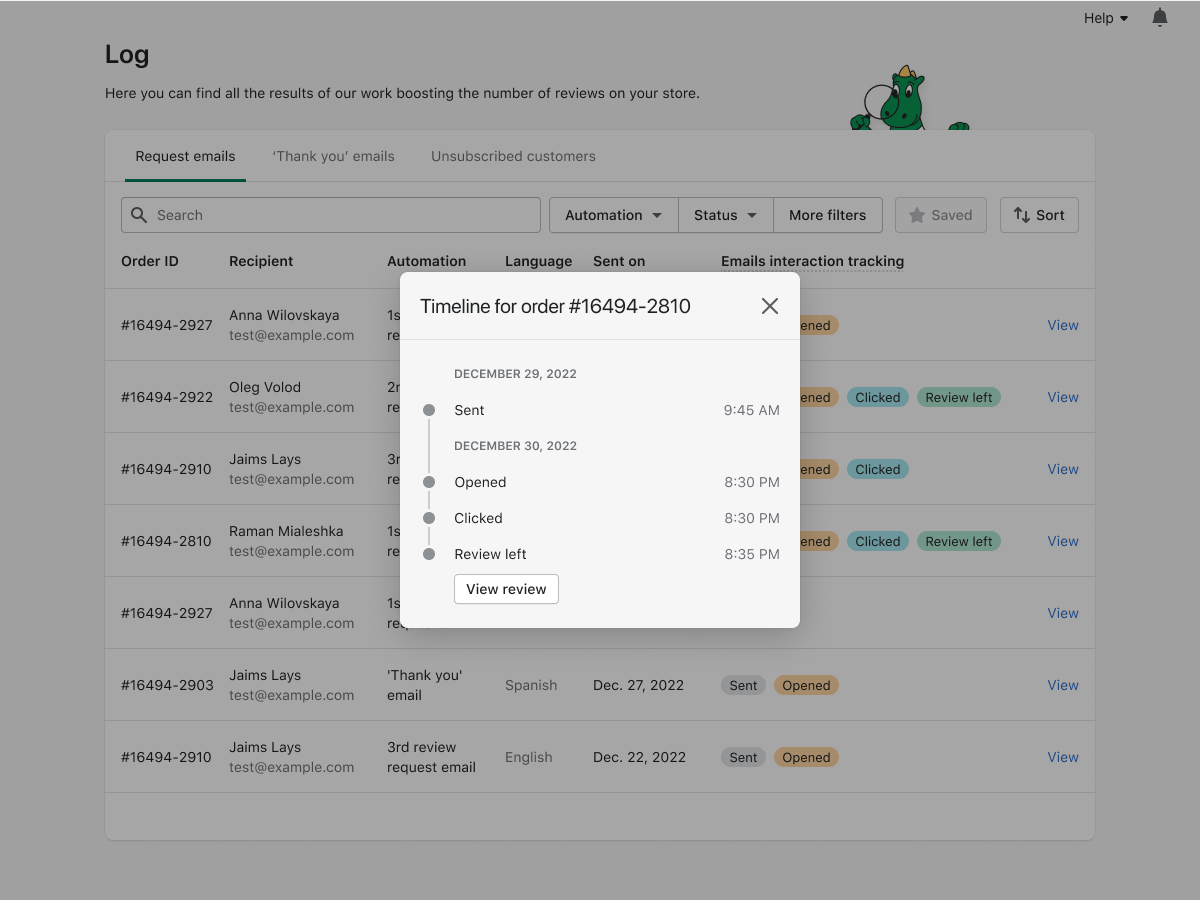
The app also provides the complete logs of all emails sent by the automations and shows you the events for every email.
For the ‘review request’ logs the following details are available:
- Order ID
- Recipient
- Automation (1st email, 2nd email or 3rd email)
- Language of the email
- Sent on date
- Email tracking events (Sent, Opened, Clicked, Review left, Unsuscribed)
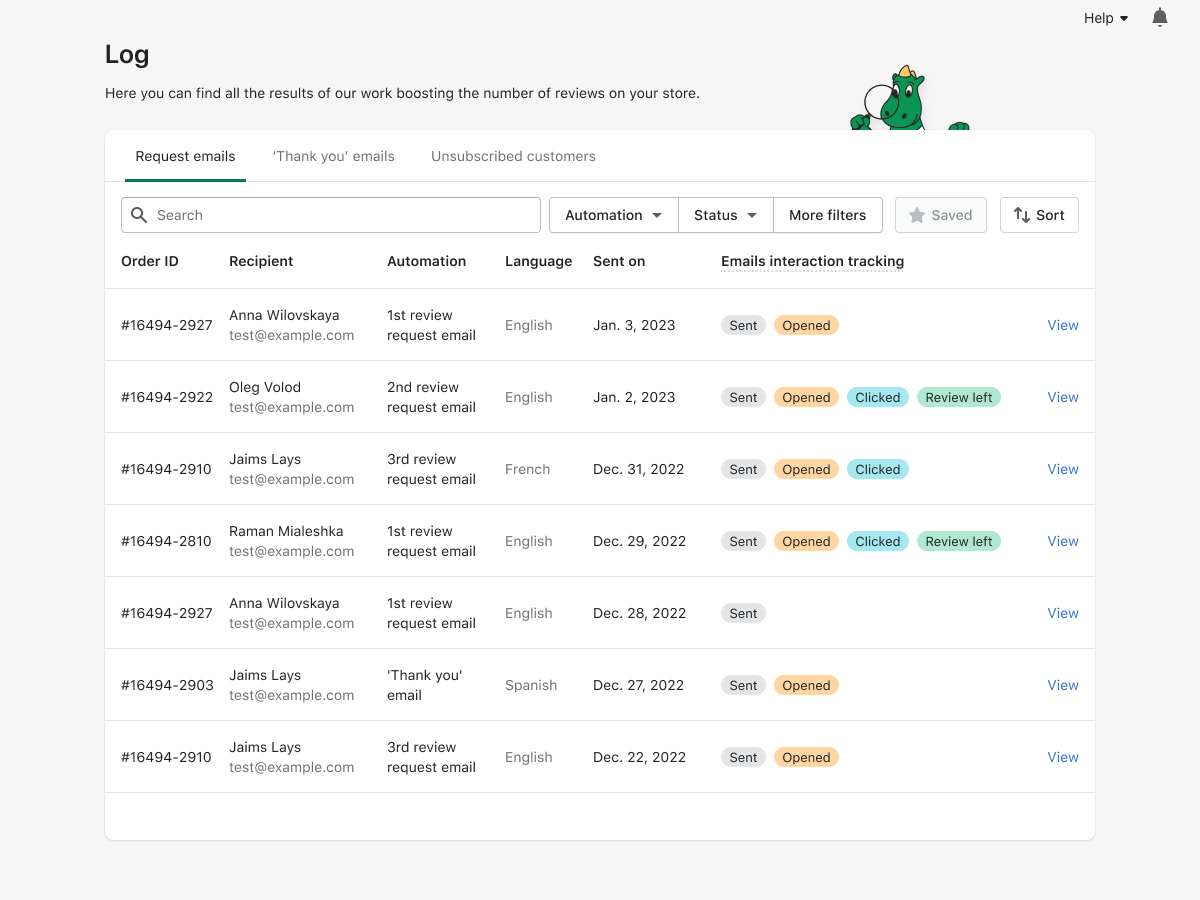
If you click on the View link, you will see the more details about the emails interaction trackings:
